
Spin Smarter: 9 Ways to Maximize Your Ride
Read this article to get some expert tips to maximize your ride and stay injury-free during indoor cycling classes.

Arrive (but Don't Leave) Early
Arrive 10 minutes before class begins, especially if it's your first time. It takes a few minutes to properly fit your bike (more on that later), and a bad set up is both incredibly uncomfortable and ups your injury risk, says Alex Figueroa, a certified cycling instructor, personal trainer, and triathlon coach in the Boston area. The extra prep time gives you the chance to ask your instructor for help if you need it and still be ready for the full warm-up, which is just as important as any other part of the ride, Figueroa says.
And don’t be tempted to slip out during the cool-down—stay for the entire class! In fact, stick around for a few minutes after the class to alleviate and prevent any pain often caused by holding a forward bend (like you do for the entire ride). Try this move from Dr. Yoav Surprun, DPT, a McKenzie physical therapist at Sobe Spine in Miami Beach: Stand tall with your feet hip-width apart. Create as large of a hollow, or sway, in the small of your back as possible by tilting your pelvis (as if pushing the belly button forward), hold the tilt for 2 or 3 seconds, and then relax. Do this 15 to 20 times.

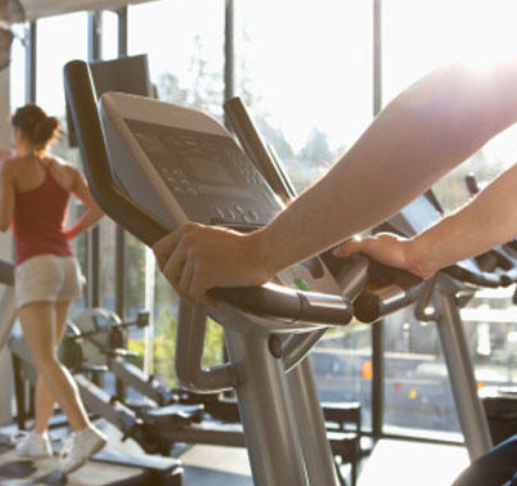
Saddle Up
Even if you've been cycling for years, things like padded shorts, new cycling shoes, or even certain muscle groups becoming more flexible can alter bike fit, says Caroline Dawson, a master instructor for Spinning® in New York City. For optimal performance, stand to the left of the bike and adjust the saddle and handlebars to hip height. Next, bend your right arm 90 degrees, form a fist, and place it at the center of the handlebars, (the part closest to the seat); move the seat forward or back until it touches your elbow.
Finally, check your work: Sitting in the saddle with your leg extended downward, your knee should have only a slight bend (about a 25- to 35-degree angle). “You want a fairly extended leg so you are not pedaling all squished up for more power and so the knees are happier,” Dawson says. When both pedals are parallel to the ground, your front knee should be directly above the center of the pedal. If it's not, you need to slide your seat forward or back until your body is in proper alignment.

Check Your Alignment
Throughout your ride, check for any excess pressure on your wrists or in your hands and if necessary, shift your weight back to where it belongs in your legs, says certified cycling instructor Paul Katami. Qualities of a good cycling posture include: hinging forward at the hips slightly, little pressure on the back, knees, and wrists, and minimal rounding of your back and shoulders.
During standing positions, make sure your hips are above your pedal stroke, Katami says. If you find yourself leaning into the handlebars (especially when pedaling out of the saddle), sit back into the saddle for a few seconds to recharge and realign your body.

Stop Competing with Your Neighbor
The group energy and dynamic of a cycling class can make it feel like a competitive sport, but its important to remember that it's not the Tour de France and you shouldn't feel pressured to outperform your classmates. Make the ride your own by setting reasonable expectations and sticking with them, Dawson says. “Make today's ride about your fitness level and body's needs for today. Balancing your performance on the bike will help you adhere to a cycling program for longer and get you more results."

Get in Gear
Sneakers and capris are fine for your first few classes, but if you want to make cycling part of your regular routine (say, at least once a week), you may want to invest in cycling shoes and padded shorts, Figueroa says.
Basic shorts range in price from $20 to $100 depending on the brand, but any pair that fits you well will help reduce discomfort. Cycling shoes clip into the pedals to prevent slipping and give you more power. They also have a solid bottom that doesn't flex, which is what you want when your feet are constantly pushing into pedals for 45 minutes to an hour, Figueroa says. High-tech designs and weather-proofing can drive prices up, but you don't need those fancy features if you're only taking a few indoor cycling classes a week. Look for a basic shoe that fits well—the sales staff can help fit you properly.
If you're still deciding if cycling is for you, wear a stiff-soled sneaker and place your feet where they're comfortable (avoid shoving your foot all the way into the end of the toe cage).

Don't Cheat Yourself
When the instructor tells you to add resistance, don’t just reach for the knob and fake it. You're not fooling anyone, but more importantly, riding without enough resistance can wear on your joints and cause injuries (and a lot of discomfort) if you're bouncing up and down in the saddle. “It's easy to see in a class when someone isn't able to create a smooth circular motion in their legs and they "bottom out," creating a sewing machine look versus and nice circular pedal stroke,” Katami says.
Figueroa agrees. “The bike will pull by the bone, but muscle pushes the bike,” he says. In order to push the bike properly, it needs to be in the proper gear, which happens by actively using your resistance knob. Remember that your primary focus shouldn’t be how fast you can spin your wheel, but your overall power output on the bike, Figueroa says. Power output is determined by your gear and your cadence (also known as revolutions per minute, RPM). “Focus on increasing your power output and maintaining it during the ride,” he says.

Crank It Up
Using more resistance will not make your thighs bigger. Cycling is a cardiovascular activity, not a strength builder. "In order for an exercise to be considered a strengh-building activity, it requires working the muscles to complete fatigue," says Amy Dixon, a celebrity trainer and exercise physiologist. In other words, you would need to put enough resistance on the bike to completely fatigue your legs in 6-8 revolutions. The right amount of resistance can make the difference between a great workout and just spinning your wheels.
To avoid using your thigh muscles (quads) too much, focus on keeping your weight back in your hips and avoid pointing your toes as you pedal, Figueroa says. By pressing through with a flat foot, you'll help maximize engagement of your glutes and hips and reduce the pressure on your quads and knee joints. Think of pulling your toes upwards as you pedal so that they're slightly above the heel (if you haven’t done it before, it might feel like your feet are flexed).
Guide Your Ride with RPM
Tracking your cadence, RPM, can help you guide your ride and provide instant feedback on your performance. If your RPM is extremely low (especially during an intense climb), you probably won't last long and should consider lowering your resistance, Figueroa says. Conversely, if you're going faster than 120 RPM, there's not enough resistance for you to be pushing the bike—the bike is pushing you. Make sure you have enough resistance to maintain control.
Think back to the last time you rode a bike outdoors—it’s pretty tough to move super fast. By using the resistance to create your "terrain," your indoor ride more closely mimics a road riding experience where you'd hardly ever go above 100 RPM, Figueroa says.
If your bike doesn't have a cadence computer on the console, you can figure it out by counting your pedal strokes for six seconds and then multiplying by 10. Sixty to 80 RPM is a good general range for climbs, and for seated or standing runs, aim for 90 to 110 RPM, Figueroa says.

Stand Up Smarter
Standing positions during your ride should be as close to your perfect seated position as possible. “Don't stand and lean forward," Figueroa says. "As soon as you come forward, all the work goes into your knee joint, which doesn’t allow the power of your muscles in the hip joint to take over." When you stand, you should still feel the nose of the saddle bumping against the back of the inner thighs, he explains.
The two standing positions you'll use:
Standing run: Many riders mistakenly focus on speed in this position and end up bouncing up and down, Figueroa says. “Hold your body steady and focus on equally pushing down and pulling up, working through a solid core."
Standing climb: Since this position requires much heavier resistance, your body weight needs to change, Figueroa says. “In outdoor cycling, you would actually tilt the handlebars to the side, so in this case, shift your body weight over each individual down stroke of the pedal… The further back your weight is, the more you’ll use the muscles in your hips—every pedal stroke is a single-leg squat."
This was originally published on Shape.com author Jessica Smith.